Hey everyone! Today is Valentine's day, and I had to do a mani for the occasion. I wasn't too inspired, so I decided to go a little out of my comfort zone and do a shatter manicure. I almost never wear shatters, but I just got this lovely red one from OPI and I figured what better occasion than Valentine's to use it? I think I have a love-hate relationship with shatters because they never work out for me formula wise. This one is actually really good, and was really easy to use. I used the shatter over Orly Cotton Candy.
Please forgive my lack of posts lately. It's really hard to keep up with a blog when I'm working full time and going to school. I always say I'll do better, but there's no way to guarantee when I'll have enough free time to swatch and post. I really do try, though :)
I love all of you! Hopefully you have something fun planned for today/tonight! (A date with some bottles of polish wouldn't be half bad haha!)
<3
Showing posts with label nail art. Show all posts
Tuesday, February 14, 2012
Tuesday, January 31, 2012
Funky Cloud Mani
I decided to try my hand at a cloud manicure a la Nailside. I always admire her manicures, and while I can't get anywhere close to her talent level, I can't resist trying out one of her tutorials every once in a while :) So here's my interpretation of a funky cloud mani:
You guys would not believe how time consuming this is!! It takes ages to layer all the colors, get the shapes right, etc.. but I like the end result. Because of all the layers, this took AGES to dry and I got tipwear/shrinking right away. I had to wrap my tips again right before I took these photos so it wouldn't look gross.
Anyway, the white is Zoya Purity, the orange is CG Life Preserver, and the purpley gray is Ulta Smoke Screen. I like the color combination. It even looks kind of tribal-ish to me. Let me know what you guys think! What color combos would look nice with this mani?
Thanks for reading!
<3
You guys would not believe how time consuming this is!! It takes ages to layer all the colors, get the shapes right, etc.. but I like the end result. Because of all the layers, this took AGES to dry and I got tipwear/shrinking right away. I had to wrap my tips again right before I took these photos so it wouldn't look gross.
Anyway, the white is Zoya Purity, the orange is CG Life Preserver, and the purpley gray is Ulta Smoke Screen. I like the color combination. It even looks kind of tribal-ish to me. Let me know what you guys think! What color combos would look nice with this mani?
Thanks for reading!
<3
Tuesday, December 20, 2011
FAIL art- Candy Cane accent nail
I was bored one night and decided to give candy canes a whirl. I wanted to do an accent nail, but I think I majorly failed at the color combo. On top of all that, my red lines smeared when I put topcoat on. I guess I didn't wait long enough for them to dry before I sealed it all up. I thought you guys might get a laugh out of my attempt :)
Baha. Next time I try something like this, I'll think it through a little more!
Thanks for reading ladies! And don't forget that today is the last day to enter my giveaway!
<3
Baha. Next time I try something like this, I'll think it through a little more!
Thanks for reading ladies! And don't forget that today is the last day to enter my giveaway!
<3
Sunday, December 11, 2011
It was a dark and snowy evening...
I felt like doing some winter/Christmas inspired stamping and this is what I came up with! I used a base of butterLONDON Royal Navy, then stamped with Konad special white and Sally Hansen Silvivor using BM14. One coat of SV to seal everything off.
I really, really like it. I got a ton of compliments on it at work today, too :) I was going to leave it with just the white snowflakes, but it didn't look finished, which is why I added the silver ones. It reminds me of a snowy winter night.
What do you guys think?
Thanks for reading!
<3
I really, really like it. I got a ton of compliments on it at work today, too :) I was going to leave it with just the white snowflakes, but it didn't look finished, which is why I added the silver ones. It reminds me of a snowy winter night.
What do you guys think?
Thanks for reading!
<3
Thursday, November 10, 2011
Corset Nails!!
This is my first attempt at doing corset nails, and I love them! I started with a base of Color Club Antiquated and then freehanded the corset with black and white acrylic paints and a teeny paint brush. For my first attempt, I think it came out pretty good. Next time, I think I'll try to make the lines a bit more thin and crisp by using an even smaller brush. After it was all done, I topped it with a coat of SV:
I love it! I've grown really fond of using acrylic paints for nail art. The only problem is that the art doesn't hold up quite as well as it would with polish. I like it better than polish, though, because it's much easier to work with and doesn't gloop up as you try to work with it.
What do you all think of corset nails? I think they're quite cute :)
Thanks for reading!
<3
What do you all think of corset nails? I think they're quite cute :)
Thanks for reading!
<3
Thursday, October 13, 2011
X&D Nail Stickers Review
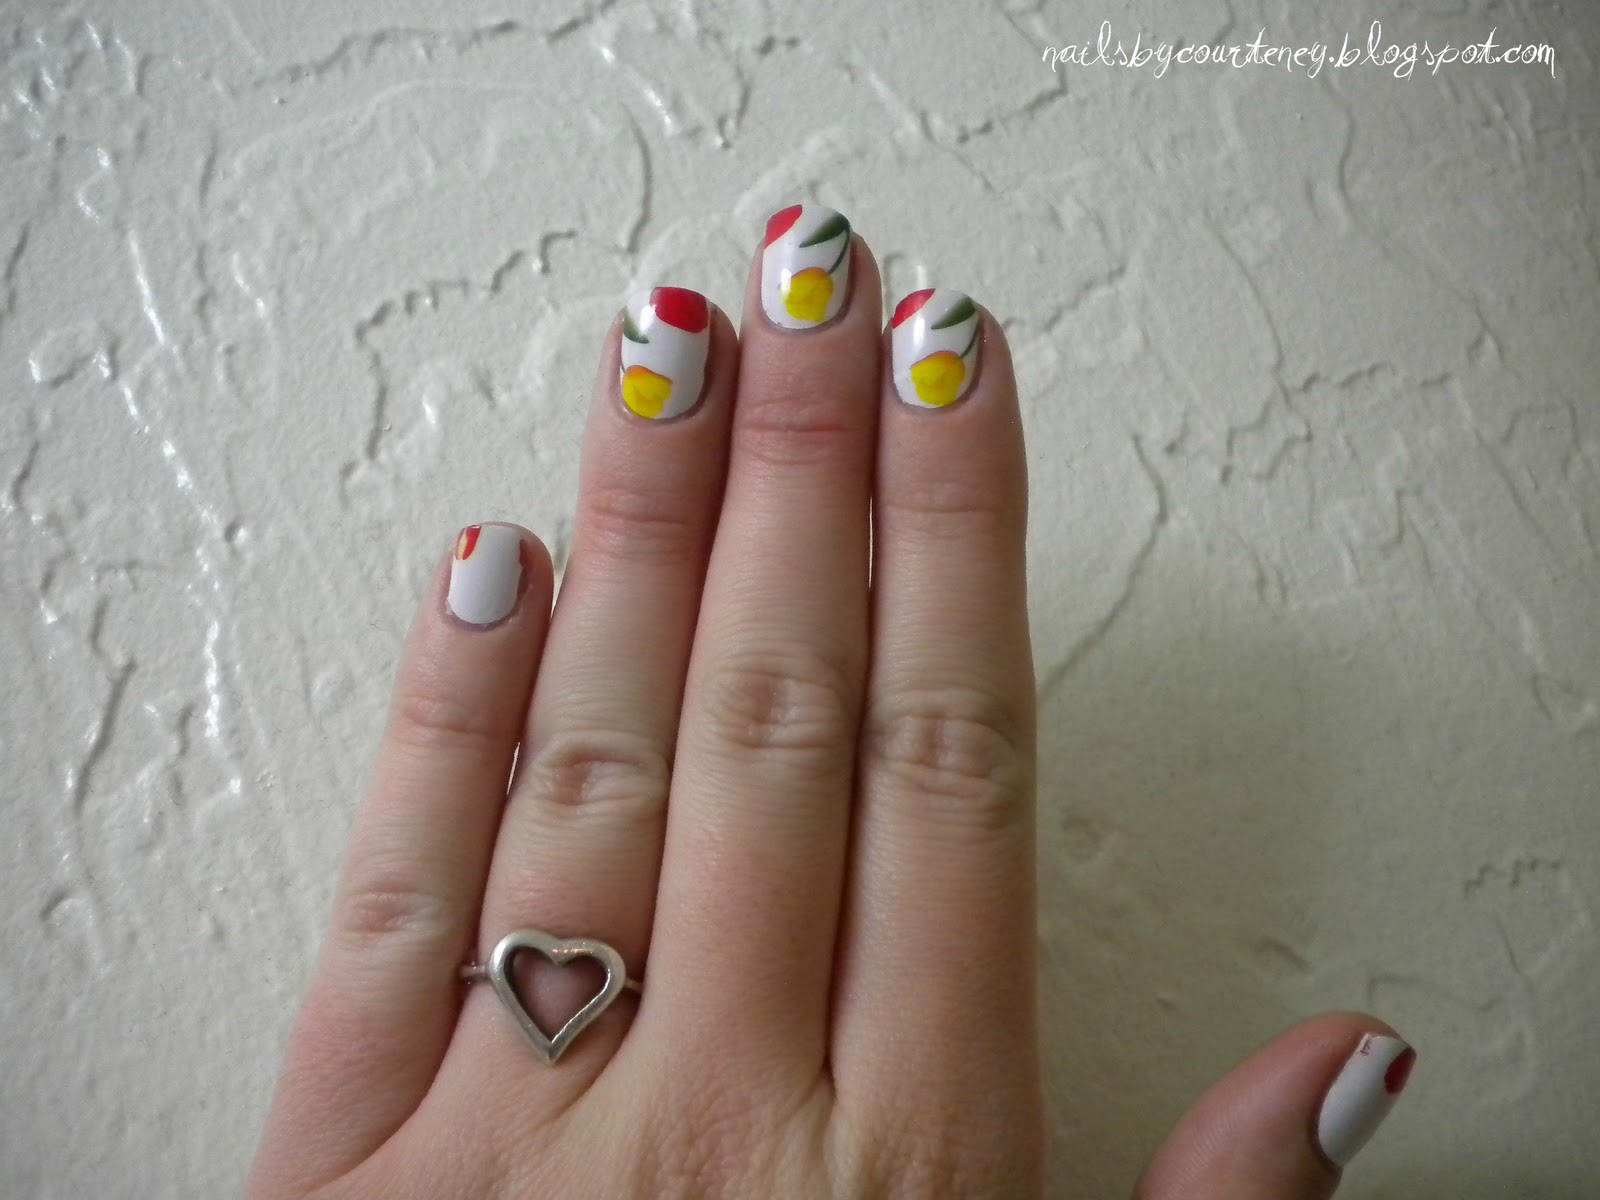
Recently I received some X&D Nail Stickers from a company called KKcenterHK that was nice enough to reach out to me to do a review for them. I was really excited to try them out thinking that they were going to be similar to the Sally Hansen Salon Effects. To my surprise, upon receiving them, I found that X&D Nail Stickers are actually not stickers at all!! They are water decals, actually. I was pretty excited about it anyway, since I had never tried water decals before. I got them in a super cute tulip/floral pattern on a white background (#14 on the website under X&D).
Let me start off by saying that the people at KKcenterHK are very friendly and customer service was great. They let me pick out the pattern I wanted and everything. Shipping was really fast considering they are an overseas company. Anyway, onto the review!!
*Please keep in mind that this was my first experience with water decals, and I may have made a few mistakes/done something differently than you would have.*
Application (forgot to take pics, oops!)
1. Started with clean, dry nails
2. I cut out all the decals and fitted them to my nails as best as I could
3. Let them soak one at a time on the water surface for about 30 seconds/until the decal peeled up
4. I took tweezers and positioned the decal on my nail and moved it around until it was in a position I was happy with
5. I took a cotton round and pressed down firmly until it stuck to my nail
6. I used the cotton round to smooth out any wrinkles until the decal was completely smooth on my nail
7. I lightly filed away the excess
8. I added topcoat and I was finished
Here's the final result right after application:
| Left Hand |
| Right Hand |
| Right Thumb |
By applying topcoat very sparingly and with only a few strokes, this is what happened:
| Left Thumb |
Immediately after applying these, I was really pleased with the outcome. Considering I was a first-timer, I thought it came out pretty good and I was OK with the application process being difficult because they looked pretty nice. As you can see, my nails are pretty short and the whole design didn't show up on my nail. I expected this going in, though. Like I said, topcoat presented an issue for me. The decals started to crackle and fall apart as I was applying it. I resolved this by applying topcoat very quickly and sparingly. Now, I thought that these were going to last a long time, but I was very shocked at how little they held up. They lasted for less than 24 hours. I applied them yesterday evening, and this morning after my shower, they started popping off. They came off all in one piece. I think I probably should have used a base coat?? I tried to watch some tutorials on applying water decals, but none of them were consistent on procedure. I feel like they would have stuck on better if I would have used base coat :/
Here's my list of pros and cons for you to consider:
Pros
There are a ton of patterns and designs available
They look great while freshly applied
They were the perfect shape for my nails. I only had fitting problems with 2 nails
They are very affordable at only $4.74 per set
KKcenterHK customer service is very friendly and efficient
Cons
Lasting power is very poor
Application was difficult and time consuming
Not topcoat friendly, I tried three different ones
| Too bad it couldn't have stayed like this, right?? |
*The product in this post was sent to me for review. All opinions are completely honest and have not been influenced whatsoever.
Wednesday, October 5, 2011
Video Game Nails: Minecraft
Minecraft is my new guilty pleasure obsession. I can't stop playing!! This mani is inspired by one of the bad guys in the game: the creeper. Creepers are basically big green things that like to find you and blow up next to you and take you down. They always have sad faces D: Here's the mani!
I know I'm not the best at freehanding yet, but I liked how it came out :) Do any of you play Minecraft? What are your favorite video games if you don't?
Thanks for reading :)
<3
I know I'm not the best at freehanding yet, but I liked how it came out :) Do any of you play Minecraft? What are your favorite video games if you don't?
Thanks for reading :)
<3
Friday, September 23, 2011
Elegant and Feminine
I wanted to stop by today to post a quick mani I did a while back. I haven't done any new ones since I got hurt, so this is all I got :) I actually really like it, it reminds me of old wallpaper, but in a good way. I started with a base of ELF Sunset and then stamped with one of my BM plates (don't remember which, sorry!). This was the result:
I'm healing up nicely. It's been three days and most of the bad punctures are starting to close up now, which is good news for polishing!! Thank you guys for all of your support and lovely comments, you all made me feel so much better! I'll be back in full force soon, so stay tuned!!!
Thanks loves!
<3
I'm healing up nicely. It's been three days and most of the bad punctures are starting to close up now, which is good news for polishing!! Thank you guys for all of your support and lovely comments, you all made me feel so much better! I'll be back in full force soon, so stay tuned!!!
Thanks loves!
<3
Sunday, September 18, 2011
Splatter 1.0
Firstly, go on over and enter my contest...you know you want to!!!
My first splatter! I used a white base and SC San Fransisco, SH Time to Shine and W'n'W Blue Moon. I used a thin coffee stirrer straw to do the splattering. I liked the thin straw because it prevented me from completely blobbing polish all over the place (which still happened a bit). Then topped it off with SH Insta Dri Topcoat:
I really like how this one turned out. Especially for my first time. Definitely going to try this again with different colors/combinations. What do you guys think? And let me know what your favorite color combos are for splatters so I can try them out!
Thanks!
<3
My first splatter! I used a white base and SC San Fransisco, SH Time to Shine and W'n'W Blue Moon. I used a thin coffee stirrer straw to do the splattering. I liked the thin straw because it prevented me from completely blobbing polish all over the place (which still happened a bit). Then topped it off with SH Insta Dri Topcoat:
I really like how this one turned out. Especially for my first time. Definitely going to try this again with different colors/combinations. What do you guys think? And let me know what your favorite color combos are for splatters so I can try them out!
Thanks!
<3
Thursday, September 15, 2011
Reader's Choice!
I finally got around to doing my reader's choice mani! The winner of the poll was dotting, but I felt like throwing some taping in there as well :)
I don't have a proper dotting tool, so I used the back of the brush I use for cleanup. As you can tell, I need some major practice with dotting. And maybe some dotting tools. I used a base of SH Pacific Blue, taped it off and added a coat of SH Laser. Dotted over the line with white polish. What do you guys think??
Thanks for stopping by!
<3
I don't have a proper dotting tool, so I used the back of the brush I use for cleanup. As you can tell, I need some major practice with dotting. And maybe some dotting tools. I used a base of SH Pacific Blue, taped it off and added a coat of SH Laser. Dotted over the line with white polish. What do you guys think??
Thanks for stopping by!
<3
Tuesday, September 13, 2011
It's Raining, it's Pouring...
Don't forget to enter my CONTEST!!
Yesterday we had a crazy storm here in northern AZ...like 1.5 in. diameter size hail. Nuts. So here's my interpretation of a rainy day on my nails :) I started with a base coat and two coats of NYX Girls Dark Gray followed by q-tip clouds using NYX Girls Perfect Gray. I added cloud details with Dark Gray and a small brush, then raindrops with Essie Smooth Sailing. The raindrops didn't turn out exactly as I had hoped, but it was still pretty cute:
Have any of you done a rainy day mani on a cold and dreary day? I felt it was appropriate :)
Thanks loves!
<3
Yesterday we had a crazy storm here in northern AZ...like 1.5 in. diameter size hail. Nuts. So here's my interpretation of a rainy day on my nails :) I started with a base coat and two coats of NYX Girls Dark Gray followed by q-tip clouds using NYX Girls Perfect Gray. I added cloud details with Dark Gray and a small brush, then raindrops with Essie Smooth Sailing. The raindrops didn't turn out exactly as I had hoped, but it was still pretty cute:
Have any of you done a rainy day mani on a cold and dreary day? I felt it was appropriate :)
Thanks loves!
<3
Friday, September 2, 2011
Sally Hansen-Time to Shine
Time to Shine is said to be a dupe of Chanel Quartz. Not sure how close it is, but it certainly looks similar! It is a metallic beigey-gold with a super flashy finish. I attempted to freehand a flower on the ring finger...total fail! Haha :)
These photos make the color seem just a wee bit more yellow than it actually is. I really like it...what do you gals think??
Thanks for stopping by! <3
Saturday, August 27, 2011
Blingy Gradient!
This is my very first attempt at a gradient mani...I think it came out decent!! Of course, there's room for improvement, but I think it's pretty ok for my first try :) I used a base of OPI Passion then sponged WnW Silvivor, NYX Perfect Gray, and NYC Black Creme. I added some silver glitter by SC afterward :)
I think I should have used a different sponge...I just used a cosmetic sponge that came in a compact.
Overall, I really love this mani!! I think it looks mysterious and edgy, but has some class at the same time. What do you guys think?? Are you fans of gradient manis?
<3!
I think I should have used a different sponge...I just used a cosmetic sponge that came in a compact.
Overall, I really love this mani!! I think it looks mysterious and edgy, but has some class at the same time. What do you guys think?? Are you fans of gradient manis?
<3!
Labels:
black,
glitter,
gradient,
nail art,
NYX,
OPI,
shimmer,
silver,
Sinful Colors,
Wet n' Wild
Wednesday, August 24, 2011
100 follower celebration nails!!!
I'm so excited to share that I have reached 100 followers!! To celebrate, I did some festive nail art :) I used a base of ChG For Audrey and dotted with SC Verbena and Unicorn. Topped it all off with a thick coat of Seche Vite. I think it looks so festive!
I want to take the time to say THANK YOU to all of my subscribers!! I wouldn't keep writing if it weren't for you. I always appreciate all of the supportive comments you guys leave me and it lets me know that I'm making an impact on someone :) 100 followers is a huge milestone for me and I'm beyond grateful for every one of you. I also want to say hello to my newer followers and that I hope you'll enjoy it here! I always end every post with a <3 and I truly mean it every time. I love you guys!
<3!!!!!!!!!
I want to take the time to say THANK YOU to all of my subscribers!! I wouldn't keep writing if it weren't for you. I always appreciate all of the supportive comments you guys leave me and it lets me know that I'm making an impact on someone :) 100 followers is a huge milestone for me and I'm beyond grateful for every one of you. I also want to say hello to my newer followers and that I hope you'll enjoy it here! I always end every post with a <3 and I truly mean it every time. I love you guys!
<3!!!!!!!!!
Labels:
China Glaze,
cream,
creme,
nail art,
purple,
Sinful Colors,
teal,
yellow
Friday, August 12, 2011
Paisley and Periwinkle!
This is my latest Konadicure. I used two coats of my current fave: ChG Secret Peri-Winkle and stamped it with M60 and Wet'n'Wild Black Creme. First of all, I just want to let all of you know how awesome Black Creme is for stamping. Def the best black for stamping that I have (I don't have special black). Topped it all off with a coat of SV.
I'm completely obsessed with this mani. Can't stop staring at it! I've gotten quite a few compliments on it today, as well :)
Thank you guys for looking! <3
I'm completely obsessed with this mani. Can't stop staring at it! I've gotten quite a few compliments on it today, as well :)
Thank you guys for looking! <3
Monday, August 1, 2011
Water Marble Attempt #2
So I was bored last night and decided to try my hand again at water marbling. I tried once before HERE, but it was my first time and my pictures were awful, but hey, I tried :) Anyway, I thought this time was a bit more successful. I still need practice getting my nails to be more uniform. As you can see from the pictures, they all look really different. This time I taped off the skin around my nails to avoid horrendous cleanup (a step I forgot last time).
For this mani I used:
Nail Magic Base Coat Therapy
China Glaze For Audrey (base color)
Nabi Rose
Sinful Colors Verbena
NYX Perfect Gray (got really sheered out, can't really see it)
Out the Door Topcoat
Let me know what you guys think! What are your favorite color combos for water marbles?
Also, don't forget to check out my giveaway! Link at the top right of my blog :)
Thanks for reading! <3
| left hand |
| left hand |
| right hand |
| right hand |
Nail Magic Base Coat Therapy
China Glaze For Audrey (base color)
Nabi Rose
Sinful Colors Verbena
NYX Perfect Gray (got really sheered out, can't really see it)
Out the Door Topcoat
Let me know what you guys think! What are your favorite color combos for water marbles?
Also, don't forget to check out my giveaway! Link at the top right of my blog :)
Thanks for reading! <3
Saturday, July 2, 2011
Sparkly Argyle :)
I decided to konad my last manicure! I really love the way it turned out:
I used a black shimmer polish by sinful colors for the stamp. I stamped with m60 (which I'm obsessed with). I really like that the pattern has some shimmer in it while the base color is a cream. I'm really diggin this mani!
Let me know what you think :D
I used a black shimmer polish by sinful colors for the stamp. I stamped with m60 (which I'm obsessed with). I really like that the pattern has some shimmer in it while the base color is a cream. I'm really diggin this mani!
Let me know what you think :D
Saturday, June 25, 2011
Sally Hansen-Sonic Bloom
Today's notd is Sonic Bloom by Sally Hansen Insta-Dry. I have been somewhat apprehensive to wear this polish for a while because it is so bright! I would consider this a very bright coral red. Bordering a neon red, but it's definitely not a neon finish. After wearing this polish for a couple of days, I have really grown to like it! It's a red that is better suited for summer as it is definitely fun and bright!
I felt that this color was asking for a konad! Now I don't want to take this polish off!!!
What do you think??
Friday, June 24, 2011
my first tape mani!
I have been seeing so many beautiful tape manicures on various blogs and since I had never tried one, I figured it was time! It didn't turn out as awesome as I wanted it to, but it was my first try :)
Sorry my picture is so wonky, but I didn't really like how it came out and was in a hurry to take pictures before I took it off. Anyway, I layered Wet n' Wild's Silvivor (insta-dry formula) over my previous manicure of Blue Moon. I like how my ring finger came out, but I severely crapped up my middle finger. Now I know better, I guess.
Basically, I just cut a bunch of really thin pieces of tape and laid them across my nails where I didn't want the silver color to be.
I'll try this again someday. For my first try, it didn't turn out horribly, but it was far from awesome!
Sorry my picture is so wonky, but I didn't really like how it came out and was in a hurry to take pictures before I took it off. Anyway, I layered Wet n' Wild's Silvivor (insta-dry formula) over my previous manicure of Blue Moon. I like how my ring finger came out, but I severely crapped up my middle finger. Now I know better, I guess.
Basically, I just cut a bunch of really thin pieces of tape and laid them across my nails where I didn't want the silver color to be.
| this is what I wish it turned out like...from lovepolish.blogspot.com |
Tuesday, May 10, 2011
Orly-Rage
Orly Rage! Is this not super duper beautiful? This color is a metallic rose gold with reflects galore! I decided to add a pretty little flower to my ring finger :)
This color is ridiculously hard to capture on camera because of its very metallic quality, but trust me when I say it is beautiful! The formula is gorgeous, perfect application in 2 coats.
I think I'm in love!
![]() |
| Indoor, no flash |
| Indoor, flash |
I think I'm in love!
Subscribe to:
Posts (Atom)